前言
查询了很多文档,但是这方面的信息非常的有限,经过各种折腾和实践终于搞定了。这里分享出来给大家看看,也作为笔记以供后面自查。
开始配置
准备工作
1. 网卡硬件配置:
- 内网物理网卡 * 1
- 公网物理网卡 * 1
- Hyper-V虚拟交换机 *1
2. 网卡IP配置
- 内网物理网卡 留空
- 公网物理网卡 配置公网IPv4(正常配置即可);配置公网IPv6,本例中为:2a01:4f8:212:1234::2/128
- Hyper-V虚拟交换机配置内网IPv4段,本例中为:172.16.2.1/12;配置内网IPv6段,本例中为:2a01:4f8:212:1234::1/64
注意!公网IPv6的子网网段要改成128!内网IPv6段根据自己需要设置即可。
也就是公网的IPv6只有一个地址,独立连外网;内网IPv6虽然和公网段是长得一样的,但是实际上是内网转发后通过公网网卡出去的,这个原理就就不细讲了。
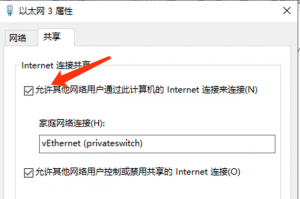
3. 开启网络共享(NAT)
公网物理网卡在属性里,设置共享网络给Hyper-V虚拟交换机
4. 测试Hyper-V虚拟机可以正常联网
[root@hSxavP1000044 ~]# ping 1.1.1.1
PING 1.1.1.1 (1.1.1.1) 56(84) bytes of data.
64 bytes from 1.1.1.1: icmp_seq=1 ttl=58 time=5.62 ms
64 bytes from 1.1.1.1: icmp_seq=2 ttl=58 time=5.42 ms
^C
--- 1.1.1.1 ping statistics ---
2 packets transmitted, 2 received, 0% packet loss, time 1001ms
rtt min/avg/max/mdev = 5.420/5.521/5.622/0.101 ms
[root@hSxavP1000044 ~]# ip route
default via 172.16.2.1 dev eth0
169.254.0.0/16 dev eth0 scope link metric 1002
172.16.0.0/12 dev eth0 proto kernel scope link src 172.16.2.7
配置IPv6转发路由
重点来了,如果只是这样图形化配置的话,Windows Server是不会转发IPv6的,只能做IPv4的转发,所以我们需要改一下路由表,并且设置网卡开启forwarding。
修改路由表
首先打开powershell,查看一下系统中的网卡:
PS C:\Users\Administrator> netsh int ipv6 show interfaces

Idx     Met         MTU          状态                名称
---  ----------  ----------  ------------  ---------------------------
  1          75  4294967295  connected     Loopback Pseudo-Interface 1
 11          25        1500  connected     以太网 3
 15           5        1500  disconnected  以太网 4
 20          15        1500  connected     vEthernet (privateswitch)
然后查看路由表情况:
PS C:\Users\Administrator> netsh interface ipv6 show route

发布    类型     跃点数 前缀                     索引 网关/接口名称
------- -------- ---    ------------------------ --- ------------------------
否        手动        256  ::/0                       11  fe80::1
否        系统        256  ::1/128                     1  Loopback Pseudo-Interface 1
否        系统        256  2a01:4f8:212:1234::/64     20  vEthernet (privateswitch)
否        系统        256  2a01:4f8:212:1234::1/128   20  vEthernet (privateswitch)
否        系统        256  2a01:4f8:212:1234::2/128   11  以太网 3
否        系统        256  fe80::/64                  11  以太网 3
否        系统        256  fe80::/64                  15  以太网 4
否        系统        256  fe80::/64                  20  vEthernet (privateswitch)
否        系统        256  fe80::24b9:6e08:f5fd:b36f/128   20  vEthernet (privateswitch)
否        系统        256  fe80::280a:7622:8501:1b71/128   15  以太网 4
否        系统        256  fe80::f95f:5b3e:7e53:560d/128   11  以太网 3
否        系统        256  ff00::/8                    1  Loopback Pseudo-Interface 1
否        系统        256  ff00::/8                   11  以太网 3
否        系统        256  ff00::/8                   15  以太网 4
否        系统        256  ff00::/8                   20  vEthernet (privateswitch)
可以看到路由表中的publish(发布)全部是关闭的,我们开启即可:
PS C:\Users\Administrator> netsh interface ipv6 set route 2a01:4f8:212:1234::/64 "vEthernet (privateswitch)" publish=yes
确定。

PS C:\Users\Administrator> netsh interface ipv6 set route ::/0 "以太网 3" publish=yes
确定。

开启后的效果如下:
<pre class="prettyprint linenums" >
PS C:\Users\Administrator> netsh interface ipv6 show route

发布    类型     跃点数 前缀                     索引 网关/接口名称
------- -------- ---    ------------------------ --- ------------------------
是        手动        256  ::/0                       11  fe80::1
否        系统        256  ::1/128                     1  Loopback Pseudo-Interface 1
是        系统        256  2a01:4f8:212:1bca::/64     20  vEthernet (privateswitch)
否        系统        256  2a01:4f8:212:1bca::1/128   20  vEthernet (privateswitch)
否        系统        256  2a01:4f8:212:1bca::2/128   11  以太网 3
否        系统        256  fe80::/64                  11  以太网 3
否        系统        256  fe80::/64                  15  以太网 4
否        系统        256  fe80::/64                  20  vEthernet (privateswitch)
否        系统        256  fe80::24b9:6e08:f5fd:b36f/128   20  vEthernet (privateswitch)
否        系统        256  fe80::280a:7622:8501:1b71/128   15  以太网 4
否        系统        256  fe80::f95f:5b3e:7e53:560d/128   11  以太网 3
否        系统        256  ff00::/8                    1  Loopback Pseudo-Interface 1
否        系统        256  ff00::/8                   11  以太网 3
否        系统        256  ff00::/8                   15  以太网 4
否        系统        256  ff00::/8                   20  vEthernet (privateswitch)
[/pax]
设置网卡开启转发功能
PS C:\Users\Administrator> netsh interface ipv6 set interface "vEthernet (privateswitch)" forwarding=enable advertise=enable
确定。

PS C:\Users\Administrator> netsh interface ipv6 set interface "以太网 3" forwarding=enable
确定。
测试是否成功
[root@hSxavP1000044 ~]# ip -6 route
2a01:4f8:212:1234::/64 dev eth0 proto kernel metric 256 pref medium
fe80::/64 dev eth0 proto kernel metric 256 pref medium
default via 2a01:4f8:212:1234::1 dev eth0 metric 1 pref medium
default via fe80::24b9:6e08:f5fd:b36f dev eth0 proto ra metric 1024 expires 1530sec pref medium
[root@hSxavP1000044 ~]# ping6 ipv6.google.com
PING ipv6.google.com(yw-in-x8a.1e100.net (2607:f8b0:4002:c05::8a)) 56 data bytes
64 bytes from yw-in-x8a.1e100.net (2607:f8b0:4002:c05::8a): icmp_seq=1 ttl=103 time=105 ms
64 bytes from yw-in-x8a.1e100.net (2607:f8b0:4002:c05::8a): icmp_seq=2 ttl=103 time=105 ms
^C
--- ipv6.google.com ping statistics ---
2 packets transmitted, 2 received, 0% packet loss, time 1001ms
rtt min/avg/max/mdev = 105.251/105.267/105.283/0.016 ms


